
But a few weeks ago on a "mommy only" trip to town, I came across this headboard at Goodwill. It reminded me of a project I saw here on Centsational Girl, one of my all-time favs. And she's a huge proponent of spray paint, which I've never used, but have been flirting with lately. So I took this little $5.99 diamond-in-the-rough (I hope) home and stored it in the garage.

Keep in mind this is a first-time project, so I may have done some steps wrong, or skipped them altogether, but I'm pleased with the outcome. Here's what I did:
1. Sand the ugly little bugger. I just used a medium grit sanding block, and I wasn't especially thorough in the little groovy turny things, which may have hampered my paint coverage in the end, but it's not too bad.

2. Wipe it down, make sure all stickers & dust is off.
3. I used Valspar's Porcelain White in the Satin finish. It's white, but not too white, but not too beige. 
4. I gave it about 3 light coats, when all was said and done. I don't know if priming it first would have reduced this, since I was painting over a dark wood, but whatever. This is me watching the paint dry.......

5. Oh, yeah. I'm done.
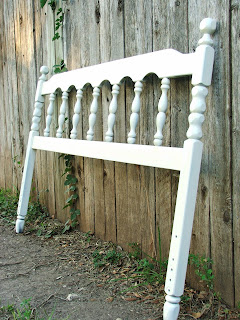
So it's all nice and painted now, and I have to decide what to do with it.
Soon we will be switching the boys' room and the guest room for a variety of reasons, but this means that I will have the "new" guest room/sewing room as a blank slate for me to decorate any which way I please. So I bought some new paint, Frosty Mint, or something like that. A lovely shade of green. And I don't know how this is going to fit, but I'm going to make it. I haven't decided if I'm going to use it as an actual headboard for the bed (that's why I left the holes in the legs, in case I need to attach it to the bedrails. Otherwise I would have puttied them and painted over them. Still might have to. We'll see), or perhaps some kind of decoration for the wall. Maybe attach upside-down hanging bundles of dried flowers? I'm thinking pretty cottagey/shabby chic kind of look.
Any ideas?

8 comments:
NICE work there little lady!! I do LOVE a good can of spray paint. Do you know about liquid sand paper? Yup...liquid. You just rub it on with a rag and you get the paint to stick just as well as if you sand it down, it's great especially for those spindle things on beds and such. Looks great, can't wait to see here she finally calls home.
I have almost the exact same headboard and I just painted it white a couple weeks ago! (Photos on my blog) Great minds must think alike. Yours came out great.
It looks great. I love the transformation a little spray paint can give just about anything.
Nice job!
~ Sarah
This looks great!
Love the cute pic of your kiddos in the header too :)
Amy
Good for you! Nice job for a "first-timer!"
rosie
Looks awesome! Wonderful job! Love goodwill!
Love it in white!
Post a Comment